Showing posts with label retro. Show all posts

Sunday, December 7, 2014

Beauty Squared Round-Up - December 7, 2014

Good morning and a happy Sunday to you.
We hope you are having a good weekend and that you'll find the links we've gathered for you this week to be interesting, informative and entertaining.

  • Yves St. Laurent beauty counters at Bay stores in Toronto and Montreal are featuring Google Glass makeup applications. What happens is the YSL MUA wears Google Glass while doing your makeup so you can watch the video recorded later and see exactly what makeup was used and how it was applied so you can recreate the look at home. Here's Janine of Beauty Geeks talking about her experience with this.
  • Three ways to make your lipstick last, no matter what you're eating and drinking or who you're kissing.
  • XOVain takes a look at the makeup and hair of the 1940s, when American women took active roles in the war effort and beauty was seen as patriotism.
  • How to apply liquid eyeliner quickly and easily.
  • Alle of XOVain shows us her minimal makeup routine

Sunday, December 8, 2013

Beauty Squared Round-Up - December 8, 2013

Hello lovelies and a happy December Sunday to you!

The Beauty Squared gals have been busybusybusy lately, so we're behind on our posting. We've got lots to share with you though, and will be getting posts up soon. In the meantime, there's a lot to round-up this week so without haste, let's dig in!


  • It's the shopping season! Here's a round-up of some of the best beauty value sets for those beauty fans on your shopping list, or maybe, as a gift for yourself!
  • And if you're more on the homemade gift side or want to save some cash, here are some fantastic ideas for DIY Beauty Gifts - Vanilla Body Cream and Crayon Lipsticks!
  • Are you bored with your red lipstick? Here are some statement lip looks you should check out as alternatives.
  • Have you seen the new MAC make-up brushes? They're...different. MUA Dustin Hunter has an in-depth review of them here.
  • Check out this gorgeous, sexy and subtly colourful smoky eye on Olivia Wilde. It uses grey, blue, brown and mint green.
  • Does eyeliner confuse you? Are you unsure what eyeliner look would suit you best? MUA Wayne Goss has some great tips that may help.
  • This is a fantastic, simple way to do a retro make-up look without it looking costumey. Classic black eyeliner flicks and red lips won't ever go out of style.
  • Look at this Louboutin-inspired manicure I came across on Twitter.
  • And check out these unbelievably creative optical illusions using only faces and makeup.
  • 'Tis the season for sparkle and parties and dressing up. 'Tis also the season for cold, dry weather and dry skin. New Beauty Magazine has a selection of the best illuminators that will give your skin a healthy, lit-from-within glow.
  • A (depressing) poll done in the UK has found that 15% of women aged 16-85 aren't aware of how prevalent Photoshop is and believe that models and actresses look the same when they're walking down the street as they do in magazines. More info as well as findings regarding body consciousness among the women surveyed can be found here.
  • Store mannequins are designed as a human ideal, a blank canvas on which clothing can be displayed to make us want to buy it. But what if they were more realistic? What if they actually looked like the people on the street looking in the store windows at them? Check out this project done by Pro Infirmis, in which people with physical disabilities have mannequins created in their likenesses. 

Wednesday, February 6, 2013

Beauty Squared Beauty Lessons: The Perfect Red Lip

A reader asked us to do a post about red lips - what products and tools to use and the steps to achieving the perfect red lip. 

In this post we'll look at the products you'll need, including the lip colours, and what you'll need to do to wear a red lip. No major sacrifices, we promise, but the red lip is a powerful thing and must not be worn casually (OK, maybe once and a while it can be). This lesson will focus on doing a classic red lip like Marilyn Monroe or Dita von Teese. 

What you'll need:
  • the lipstick (see Step one)
  • a lipliner that matches your lipstick
  • a clean, dry toothbrush
  • Kleenex
  • a rich, moisturizing lip balm
  • a lip brush
Step one: Choose your product. 


You'll want to choose a matte lipstick in a bold true red, like MAC's Ruby Woo (widely known in the beauty world as a universally flattering red). If Ruby Woo is not for you, check out NARS' Dragon Girl or MAC's Russian Red. 

Step two: Prep your lips. 

Wash your face and prep with moisturizer. Using a clean, dry toothbrush gently exfoliate your lips in a circular motion. The skin on your lips is thin so be gentle. This step will remove any dry, dead skin.


After exfoliating, apply a rich, creamy lip balm. It will absorb into your freshly scrubbed lips and provide a smooth surface for your lipstick application later. Moisturizing your lips before applying lipstick will also help to keep your lips from drying out.

Step three: Perfect your skin. 

You'll want to have the most perfect skin you can possibly achieve if you want to pull off this kind of lip look. If your skin is good on its own, lucky you! Otherwise, foundation, concealer and powder need to be applied. Take the photo of Dita above as your inspiration as well as this one of Marilyn Monroe.


You want an even-toned, well powdered (but not powdery) complexion. Keep the rest of your look simple and neutral but polished - a bit of eyeliner, some false lashes (if you like), neutral eyeshadow, some light blush or bronzer, and well-groomed brows.

*My favourite way to wear a red lipstick in this classic style is with a line of liquid eyeliner, flicked out at the end, a neutral matte eyeshadow that matches my skin tone but brightens it (IE. MAC Brule) on the lid, a neutral matte crease colour like MAC Wedge, and a soft highlight on the brow (IE. MAC Shroom).  Maybe a little bit of Wedge underneath the eye. Lots of mascara and maybe some false lashes. I'll use a soft, warm blush to softly contour my cheeks and temples or add a soft pink to my apples, very, very lightly. I'll shape my brows into the classic 50s shape (slightly squared off at the start and gracefully arched and elongated).

Step four

Line your lips. First blot your lips to remove any excess lip balm. Any excess will make your lips slippery and your liner and lipstick will have trouble adhering. Messy! With a sharpened lip liner line the outside of your lips carefully. The best way to do this is is to smile with your lips closed to draw the skin of your lips as taut as possible. Follow your natural lip line and if your lips aren't naturally even, make adjustments as needed with the liner. Check your work in the mirror to ensure that you've drawn an even line all the way around your lips.


Use a Q-tip to erase any mistakes. Sharpen the pencil if you need to. With a Q-tip soften the edges of your lips if they appear too harsh or if you've drawn outside the lines.


Once you've got the shape you want, fill in your entire lip area with the liner. This will ensure that when your lipstick wears off you won't be left with an outline of red around the outside of your lips.


Step five: Apply lipstick. 

Using a lip brush is very important when you're applying a bright, dark or bold colour. It allows you to have a lot of control over where you apply product and where you don't. You want a small, flat lip brush for this.


Take a small amount of lipstick onto the brush. Start with a little because you want to have as much control as possible applying it. You can add as you need to. Where you start applying is up to you - but it may be easier to go along the outside of your lips and work in. In the centre you can be a little less cautious with your application but make sure to go slowly around the edges. 


Step six: Blot and powder. 

When you've got a layer of lipstick on, you'll want to blot. This has the same effect as blotting the excess lip balm off before applying lipliner. It'll remove excess lipstick and leave more of a stain behind which will make your lipstick last longer. 

To do this, separate a piece of Kleenex into two layers. Press one of these layers onto your lips. Using a brush that's been dipped in powder or a powder puff with powder on it, press powder lightly onto the tissue. A small amount of powder will transfer through the tissue onto your lips but not enough to change the texture or colour. This will make your lipstick last longer. 


Step seven: Apply lipstick. 

Apply another layer of lipstick on top of the blotted and powdered layer. 

Step eight: Blot. 

Using the second layer of tissue, blot your lips again by pressing them against the tissue. 
 
You're done! You should now have your completed, perfect red lip that will last and last. 


*Note: I used a photo of my full face even though I'm only wearing foundation, concealer and powder (no mascara, eyeshadow, brow colour or blush) apart from the red lipstick, to show how I could possibly go out just like this. The red has that much of an impact and it shows how keeping the rest of the face simple (even this simple) is so important. 

There are other ways to wear a red lip, aside from the look detailed in the steps above. You could use the same lipstick and tap it lightly onto your lips using your finger to create a stained effect. You could top it with a gloss to make a high-shine red lip. You could use a sheer red lipstick for an everyday red lip with clean skin.

One of my favourite ways to wear a red lip is with clean skin, a bit of soft gold eyeshadow, a tiny bit of blush, strong brows and lots of mascara. In the photo below, my red lips are NARS Dragon Girl Velvet Matte Lip Pencil. It's a simple, glam look without looking too done.


For some more red lip looks, please check out the posts here and here.


A red lip is not the easiest makeup look to achieve, but it's definitely worth mastering. If you have any questions, please ask in the comments below!


Sunday, February 3, 2013

Beauty Squared Round-Up - February 3, 2013

Happy February, dear readers! Here's Beauty Squared's Round-Up for this week.
I guess we should note that this is our 600th post...wow! 
Thank you for reading.


MAC's Archie's Girls collection launched online this past week and will be in stores next week. MTV make-up artist Lucky Bromhead works her magic and creates a Betty out of MuchMusic's Liz Trinnear and a Veronica out of MTV's Aliya Jasmine using the collection - check out the photos!

Attention oily and combination skintypes! Garnier is releasing a BB cream just for you. 


Glamour lists the makeup shades (lipstick, eyeshadow, lipgloss and blush) that look good on every skin type (or so they claim). There's so real explanation about how these shades would work on someone with fair skin AND on someone with dark skin but hey, it's a good starting place if nothing else.


Men used to wear high heels and not just for fashion shoots and runway shows as they are occasionally asked to do now (above). The BBC takes a look at this once essential men's fashion accessory.


Actress Michelle Dockery plays Lady Mary on 'Downton Abbey'. The above photo is from an Interview Magazine shoot, but take a look at her style evolution courtesy of InStyle. 


Two books released by the British Library takes a look at beauty and style tips from the Victoria era. 


I hate it when that divine glittery nail polish (I'm looking at you butter London's Knackered) is so unbelievably difficult to remove. Apparently using Elmer's Glue as a base coat can make removing it a snap? Has anyone tried this? Wouldn't it mean that it'd peel off before you wanted it to?


So Jane Seymour is 61 years old. You read that correctly. And she claims to have never had plastic surgery. Thank god for aging gracefully, Jane Seymour, Helen Mirren, Judy Dench, et al!


How to create glamourous and sultry Veronica Lake retro-inspired waves


Go to your underwear drawer and give all of that lace, underwire and mesh a hug and thank them for all the support they've given you. The bra turned 100 this past week. 

The latest beauty product that everyone seems to be talking about are the Hourglass Ambient Lighting Powders. They claim to give the skin that elusive glow that certain lighting situations can give (candlelight, sunset, moonlight, etc). Check out Karen of Makeup and Beauty Blog's review of a few of them.

Wednesday, November 21, 2012

Studio Girl Make-Up Kit


I attended a lecture on 1950s fashion at the Bata Shoe Museum in Toronto last weekend. The woman who spoke is the owner of a vintage store called Gadabout Vintage and she had brought some 1950s clothes and accessories with her to show us. One of the items was this make-up kit from Studio Girl. I fell in love with all the little bottles inside - many of which still had product inside.

The tall glass bottles with the white lids in the back of the top shelf were cologne and the white jar containers contained what I suspect were creams and lotions. The tiny vials along the front of the top shelf were cosmetics. I think they were foundations, concealers and cream colours to that effect. See the reddish colours? These were probably used as blush. The vials to the right were likely for concealing and highlighting. There's a small gold tube of lipstick, still mostly intact, on the bottom of the case. It was a deep, bright red, called True Red. Very Marilyn Monroe. 

How delightful to see what women in the 1950s would have bought and used. 

C.

Saturday, September 15, 2012

Wearing Anna Sui to my little brother's wedding - Rent Frock Repeat

I rarely have an event that I'll need a specific dress for but my mind was working overtime prior to my only brother's wedding in August. I didn't know where I was going to find something and to be honest I was dreading it.


Then I heard about a new business called Rent Frock Repeat that rented designer dresses for events for a fraction of the cost of buying them off the rack. I had some apprehensions such as if they would have dresses in my size and if they would have something that suited my style and the event.

You need to join Rent Frock Repeat to see their selection of dresses, but it's free and well worth your time. They will ship dresses anywhere in Canada, but if you live in the Greater Toronto Area you can also book an appointment to try on dresses. Once you've signed up, you can look through their inventory and save favourites to your profile. You can sort by colour, size, style, price range, designer, sleeve style, length, occasion, body type and neckline. As soon as I chose my dress size, my choices dropped significantly, which didn't surprise me. Designers don't tend to make their clothes in larger sizes. But I was not disappointed by the choices I had, not at all. Hello David Dixon! Hello Badgley Mischka! Hello Jill Stuart! Hello Christian Siriano! Hello Robert Rodiguez! I made a few selections according to price and style and booked my appointment.

Walking into the Rent Frock Repeat showroom was an experience. It's a large, open space filled with racks and racks of dresses. I answered a few questions (dress size, event, measurements), they took a look at my saved favourites, gave me a pair of 5 inch platform heels, and I was in the change room trying on my first dress, a purple, silk, 40s style, feminine Anna Sui. It had been one of the ones I'd chosen on the website, and despite the other 10 or so dresses I tried on, it was the one I ultimately chose.

But I should tell you about the other dresses I tried on. Kirsty, one of the co-founders, was choosing dresses for me based partly on the ones I'd selected on the website and on ones she knew would work on me. Each of the dresses, apart from one, that I tried on looked really good on me. Some of the stand-outs were:

  •  a beautiful blue and white sequinned David Dixon strapless dress. The sequins are matte, so they shimmered rather than sparkled and despite it's looser-fit, it's internal structure was actually quite flattering. I'd never worn a strapless dress before, and I was surprised how flattering it actually was (I've got very large breasts).
  •  a 50s-style, structured and dramatic peach and white Badgley Mischka. This one is very Mad Men, something you could see Joan Holloway wearing but in a darker colour. I looked great in it, but the neckline was too low for the occasion.
  •  a classic, red, structured, Jackie O-style David Dixon. I loved this one, but I felt too confined in it with its high, wide neckline. It also felt like something someone might wear to a work event.
  •  a dramatic, deep purple, slinky David Meister with an asymmetrical neckline and a jewelled embellishment at the shoulder. This was very sexy and absolutely fabulous on my curves but more appropriate for colder weather and an evening event.
  •  a navy Badgley Mischka with cold-shoulders and a jewelled embellishment on the waist. This is one of RFR's most popular dresses, and I can see why. It works on a number of body types, is slinky enough to feel sexy but in a sophisticated way. If I need a dress for an event in the fall or winter, this is definitely the one I'll rent.
Each dress that I liked was saved to my Wish List online for future reference and there are one or two that stick in my mind and are definitely going to be rented by me in the future! I just need the events!

That very first dress I tried on was still in my mind at the end of the dresses I tried on, so I wanted to try it again. Yes, that lovely, purple Anna Sui dress was the one I had to take. There was no question. It was perfect for an outdoor, summertime wedding, wasn't overly sexy (no cleavage!), the colour was very flattering with my skintone and hair colour, and it fit me near perfectly. 

I felt so beautiful and so confident in those dresses. At one point, I actually said "Oh my god, I love my body!" - how many times have I said that standing in an H&M dressing room? Never. There's something about trying on beautifully-made clothes and something about the way that they feel on. And wearing clothes that have been chosen based on your body type. I can't say enough about the experience. If you live in the Toronto area, and you have an event coming up, go and try on dresses at Rent Frock Repeat!

I paid on the spot ($115 for a four day rental) and saved on the shipping charges since I live a short walk away from Rent Frock Repeat and could both pick up the dress and drop it off.

I booked the dress a few months before my brother's wedding which made me a little anxious. Choosing accessories without having the dress was a bit of a challenge, as was the persistent thought that I may have lost or put on weight in the months in between trying it on! But the day before the wedding, I picked it up and they had me try it on to be sure it still fit and that I still loved it. And it did and I did, to my relief. 

You want to see photos, don't you? Here you go. 


Awkward pose #1

The dress has little cap sleeves, a cut-out neckline and soft draping at the hips. Shoulder pads give a strong shoulder and it hugged my bust and waist down to the soft draping at the hips. I felt beautiful in it and it was incredibly comfortable. There was no pulling, tightness, riding up or down and I didn't feel the need to tug at it at all to adjust it as I typically do with clothes. I absolutely loved that I didn't have to be concerned about showing too much cleavage. The cut-out neckline covered my chest enough to not look too sexy or vulgar (as large breasts have a tendency to) but it showed enough skin to not look frumpy. The way the skirt hugged my hips and flowed down to gently skin my legs was so pretty and so easy to wear. The ruffle down the center of the skirt conceals a slit that makes it so comfortable to move around in. I felt like a real lady in this dress.


Awkward Pose #2


Slightly Less Awkward Pose

I didn't want to look like I was wearing a costume, so I paired my dress with accessorizes that made the entire look more contemporary. I love the combination of purple and green and knew that choosing an edgy shade of green would make it modern and a little edgy. 

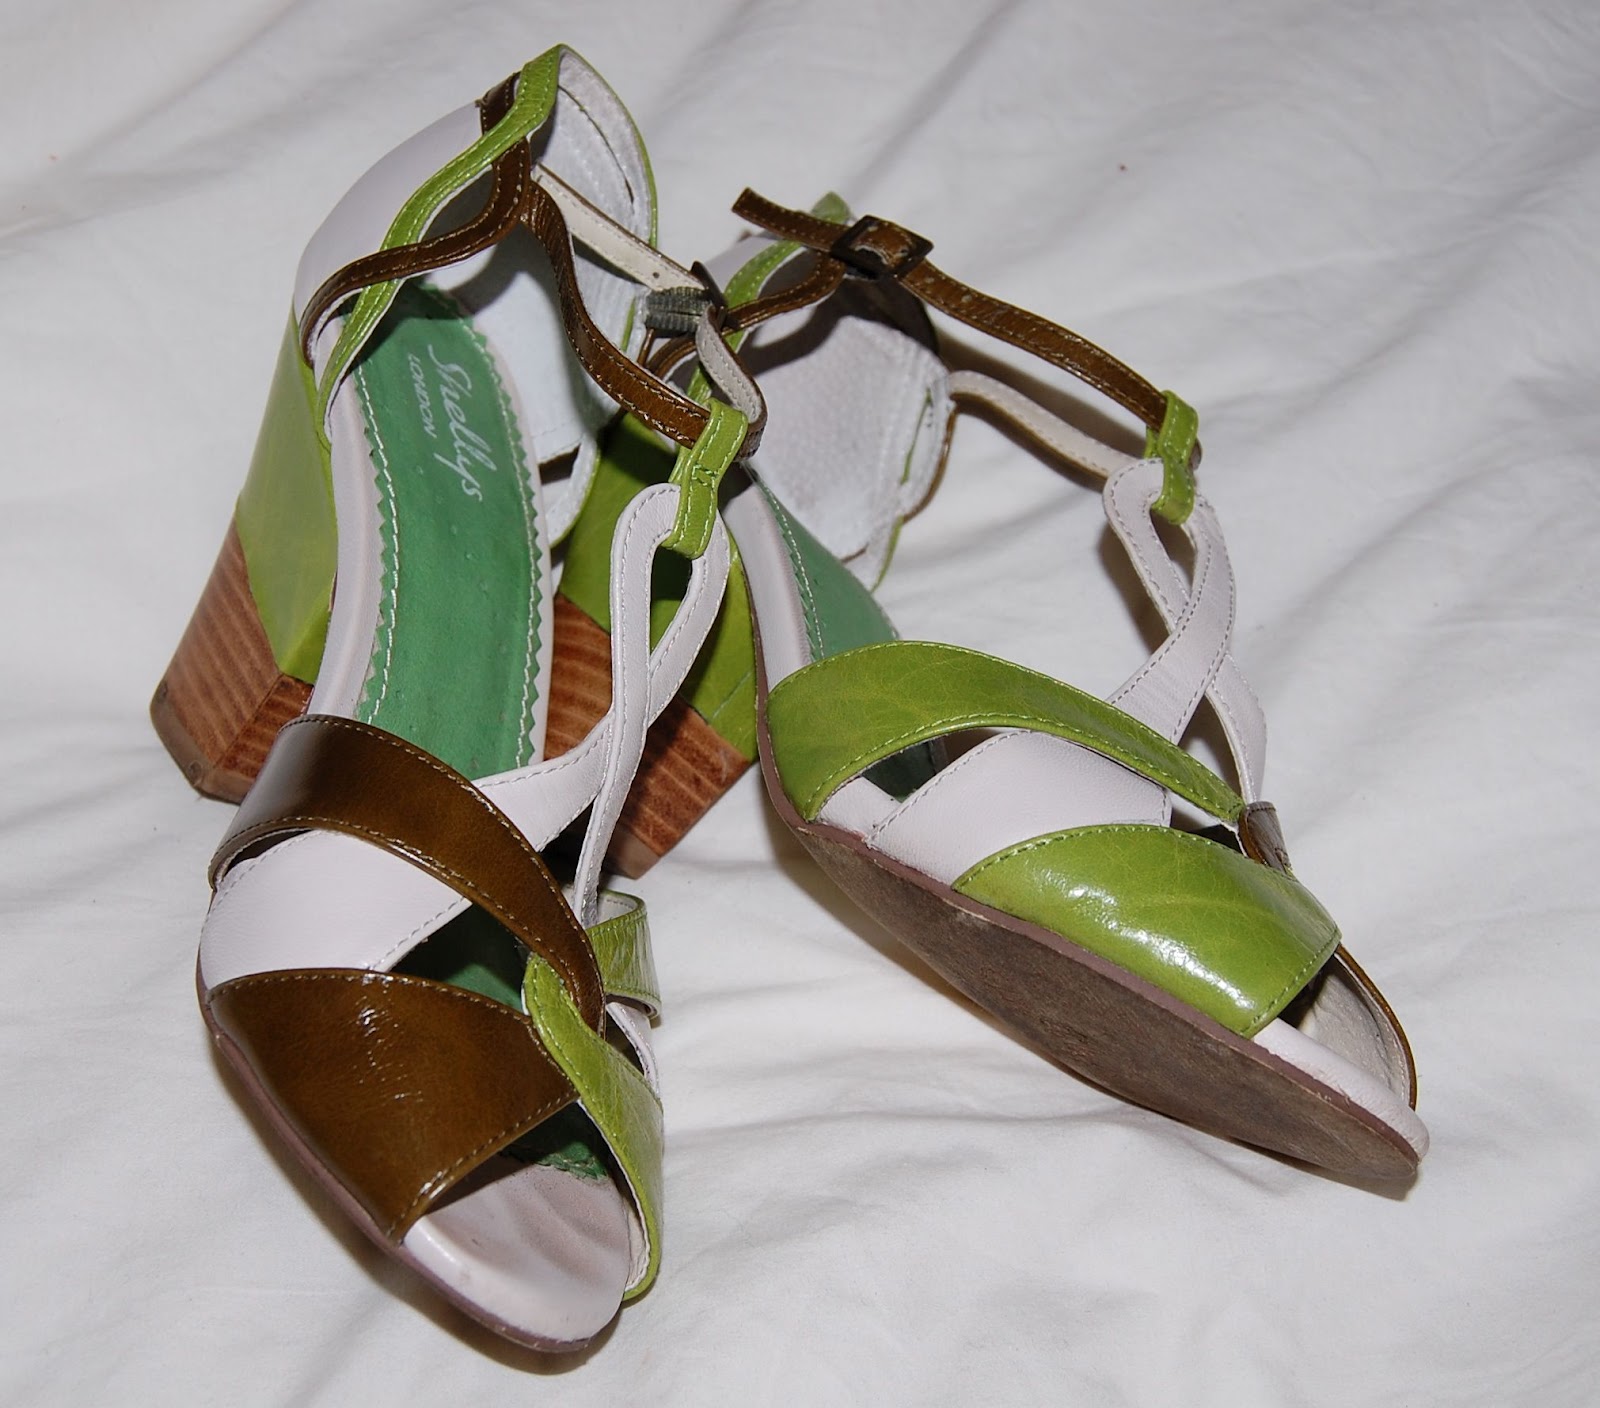
Shoes - Shelly's of London, bought at Balisi.
I love these shoes. The T-strap is so retro and the thicker heel made them perfect for an outdoor wedding - no attempting to walk on grass in stilettos!

Wrap - Ralph Lauren from The Bay.
Clutch - Urban Expressions  from Balisi.
The gold studs on the clutch adds a touch of rock & roll to my look and the gold also ties into the brown and wood in my shoes.

Bangle - Forever 21.
How perfect is this bangle that I found at Forever 21 for about $5 CDN two days before the wedding? 


Earrings - Forever 21.

Delicate, sparkly, sophisticated little drop earrings that were ridiculously inexpensive. I think I paid $4 CDN for them.


I did my own makeup, of course, as well as the bride's (stay tuned for another post on her look). I kept it simple with softly glowing skin, defined brows, a thin eyeliner line, slight crease contour, soft pink blush and bright matte pink lips (MAC's Force of Love). I was short on time admittedly, but I don't think I would've done anything different to my makeup. 

My hair was done in finger waves with gently curling ends. Savanna at Parlour Salon did a fantastic job. 


Here it is from the back. I also want to note how much I love the shape the dress gives my shoulders. 


This is me with the bride and groom and my mother on the beach near the venue having our photo taken.

It was a beautiful day made perfect by Rent Frock Repeat. I was able to enjoy myself so much more without having to worry about my dress looking inappropriate or ill-fitting. They made it so easy to find a dress and I can't recommend them enough!

Oh, and when I picked up my dress, they provided me with a little bag of must-haves for my event:


Double-sided tape, lint removing sheets and a deodorant removing sponge - how incredibly thoughtful and clever! And of course, adorable packaging. 

It was less nerve-wracking that I expected to rent a dress. Of course, I was worried that I'd spill something on it, or tear it, or break the zipper, but just being a little cautious was all I needed to keep it in perfect condition. In fact the dress fit so well, and so comfortably, I didn't want to take it off at the end of the night. I think I'd have been able to comfortably sleep in it! (I didn't, of course.)

I have been telling everyone about Rent Frock Repeat. Everything about my experience with them was wonderful - exceptional customer service, attention-to-detail, and I felt special being one of their customers. 

Check them out at www.rentfrockrepeat.com. They're getting in more plus-size dresses soon and will change their stock with the seasons! I missed their first sale, held a few weeks ago, where they discounted some of the stock to make room for the new fashions, so follow them on Twitter and like them on Facebook if you're interested in keeping up with what's happening with them.

Any questions? I'm happy to try to answer them.

Thank you, thank you, thank you, Rent Frock Repeat for giving us the chance to wear gorgeous designer dresses for a fraction of the cost. 

Catherine

Wednesday, August 17, 2011

30s style manicure

A Cutex ad from the 1930s
The other day I saw a story on Jezebel.com about how to do a 1930s manicure. I wondered about this as it had never occurred to me that 1930s women would've done anything that required how-to lessons. But reading on and doing some Internet research I discovered that the chic 1930s lady did do something really interesting with their nails. 

Dita von Teese with a 1930s style manicure

Ladies of the Art Deco and Great Depression era used to paint just the centre of their nails, leaving the half moon cuticle and tips of their nails bare. Towards the end of the decade, they left only the half moon cuticle bare and painted all the way to the tip. Colours ranged from corals and reds to greens and the popular shape was an almond shape. You can read more about it here.

I'm fond of vampy nails and unexpected colours like grey, bright green or orange lately and I've never had even a french manicure, so I thought I might try this edgy retro look. 

MAC Nail Lacquer in Vintage Vamp,
Sally Hanson Complete Salon Manicure Polish in Polar Bare
 and french manicure nail stickers
What you'll need:
  • Base coat
  • Bottom colour (a light shade like white or fleshtone)
  • French manicure stickers (available wherever nail products are sold)
  • Top colour (red, coral or burgundy if you want to keep it authentic)
  • Top coat
The first step is to apply a base coat and allow it to dry. Then you'll want to paint your light shade all over your nail. You can use any light colour, sheer or opaque. Try a pearly pink, peach or white. I had hoped the white shade I'd bought was more opaque but it did what I needed it to.

Let the polish dry and then let it dry some more. You'll be putting stickers on top of the polish so it needs to be as hard as possible. 


Next, place your french manicure nail stickers - one on your nail tip and one along your half moon cuticle. This is much easier to do on your non-dominant hand so you might want to get someone to help you. I'm right-handed so the finished nails on my right hand aren't as clean as the nails on my left hand. This is probably something that comes with practice as those of you who do your own french manicures probably know!

Press the stickers down so they adhere to the skin and the nails as closely as possible. You don't want any of the darker shade to seep or bleed underneath the stickers. 

Your nails should look something like this once the stickers are in place.

Kinda cool-looking, right?

Apply the darker shade, overlapping the stickers slightly, with as many coats as needed to get the effect you want. Allow the polish to dry in between coats completely but after you've applied your final layer, you want it to almost completely dry before you remove the stickers.

This is my hand with one coat of Vintage Vamp applied.


When your nails are almost completely dry, carefully peel off the stickers. 

Here is my finished hand. I always end up getting polish on my skin but in the morning when I shower, it peels off. With a Q-tip dipped in polish remover I cleaned up the mess a little for the photos though.


It's a very cool look as well as being retro, although I bet no one would guess that it's retro.

I did a more traditional 30s manicure but of course, this look can be done with any combination of colours. What about using black as your base and green on top? Or yellow and orange? 

I love this look, what do you think?
C.